pythonanywhere: นี่คือโพสต์ที่เกี่ยวข้องกับหัวข้อนี้
Table of Contents
Turning a Python script into a website
One question we often hear from people starting out with PythonAnywhere is “how do I turn this
script I’ve written into a website so that other people can run it?”
That’s actually a bigger topic than you might imagine, and a complete answer would wind up
having to explain almost everything about web development. So we won’t do all of that in this
blog post 🙂 The good news is that simple scripts can often be turned into simple websites
pretty easily, and in this blog post we’ll work through a couple of examples.
Let’s get started!
The simplest case: a script that takes some inputs and returns an output
Let’s say you have this Python 3.x script:
number1 =
float(input("Enter the first number: "
))
number2 =
float(input("Enter the second number: "
))
solution =
number1 +
number2
print
("The sum of your numbers is {}"
.
format(solution))
Obviously that’s a super-simple example, but a lot of more complicated scripts
follow the same kind of form. For example, a script for a financial analyst might
have these equivalent steps:
- Get data about a particular stock from the user.
- Run some kind of complicated analysis on the data.
- Print out a result saying how good the algorithm thinks the stock is as an investment.
The point is, we have three phases, input, processing and output.
(Some scripts have more phases
– they gather some data, do some processing, gather some more data, do more processing, and so on, and
eventually print out a result. We’ll come on to those later on.)
Let’s work through how we would
change our three-phase input-process-output script into a website.
Step 1: extract the processing into a function
In a website’s code, we don’t have access to the Python input or print functions,
so the input and output phases will be different – but
the processing phase will be the same as it was in the original script.
So the first step is to extract our processing code into a function so that it can be
re-used. For our example, that leaves us with something like this:
def
do_calculation
(number1, number2):
return
number1 +
number2
number1 =
float(input("Enter the first number: "
))
number2 =
float(input("Enter the second number: "
))
solution =
do_calculation(number1, number2)
print
("The sum of your numbers is {}"
.
format(solution))
Simple enough. In real-world cases like the stock-analysis then of course there would
be more inputs, and the do_calculation function would be considerably more complicated, but
the theory is the same.
Step 2: create a website
Firstly, create a PythonAnywhere account if you haven’t already. A free “Beginner” account is enough for this tutorial.
Once you’ve signed up, you’ll be taken to the dashboard, with a tour window. It’s worth going through
the tour so that you can learn how the site works – it’ll only take a minute or so.
At the end of the tour you’ll be presented with some options to “learn more”. You can just click “End tour” here,
because this tutorial will tell you all you need to know.
Now you’re presented with the PythonAnywhere dashboard. I recommend you check your email and confirm your email address –
otherwise if you forget your password later, you won’t be able to reset it.
Now you need to create a website, which requires a web framework.
The easiest web framework to get started with when creating this kind of thing is
Flask; it’s very simple and doesn’t have a lot of the built-in
stuff that other web frameworks have, but for our purposes that’s a good thing.
To create your site, go to the “Web” page using the tab near the top right:
Click on the “Add a new web app” button to the left. This will pop up a “Wizard” which allows you to configure your site. If you have a free account, it will look like this:
If you decided to go for a paid account (thanks :-), then it will be a bit different:
What we’re doing on this page is specifying the host name in the URL that people will enter to see your website. Free accounts can have one website, and it must be at yourusername.pythonanywhere.com. Paid accounts have the option of using their own custom host names in their URLs.
For now, we’ll stick to the free option. If you have a free account, just click the “Next” button, and if you have a paid one, click the checkbox next to the yourusername.pythonanywhere.com, then click “Next”. This will take you on to the next page in the wizard.
This page is where we select the web framework we want to use. We’re using Flask, so click that one to go on to the next page.
PythonAnywhere has various versions of Python installed, and each version has its associated version of Flask. You can use different Flask versions to the ones we supply by default, but it’s a little more tricky (you need to use a thing called a virtualenv), so for this tutorial we’ll create a site using Python 3.6, with the default Flask version. Click the option, and you’ll be taken to the next page:
This page is asking you where you want to put your code. Code on PythonAnywhere is stored in your home directory, /home/yourusername, and in its subdirectories. Flask is a particularly lightweight framework, and you can write a simple Flask app in a single file. PythonAnywhere is asking you where it should create a directory and put a single file with a really really simple website. The default should be fine; it will create a subdirectory of your home directory called mysite and then will put the Flask code into a file called flask_app.py inside that directory.
(It will overwrite any other file with the same name, so if you’re not using a new PythonAnywhere account, make sure that the file that it’s got in the “Path” input box isn’t one of your existing files.)
Once you’re sure you’re OK with the filename, click “Next”. There will be a brief pause while PythonAnywhere sets up the website, and then you’ll be taken to the configuration page for the site:
You can see that the host name for the site is on the left-hand side, along with the “Add a new web app” button. If you had multiple websites in your PythonAnywhere account, they would appear there too. But the one that’s currently selected is the one you just created, and if you scroll down a bit you can see all of its settings. We’ll ignore most of these for the moment, but one that is worth noting is the “Best before date” section.
If you have a paid account, you won’t see that – it only applies to free accounts. But if you have a free account, you’ll see something saying that your site will be disabled on a date in three months’ time. Don’t worry! You can keep a free site up and running on PythonAnywhere for as long as you want, without having to pay us a penny. But we do ask you to log in every now and then and click the “Run until 3 months from today” button, just so that we know you’re still interested in keeping it running.
Before we do any coding, let’s check out the site that PythonAnywhere has generated for us by default. Right-click the host name, just after the words “Configuration for”, and select the “Open in new tab” option; this will (of course) open your site in a new tab, which is useful when you’re developing – you can keep the site open in one tab and the code and other stuff in another, so it’s easier to check out the effects of the changes you make.
Here’s what it should look like.
OK, it’s pretty simple, but it’s a start. Let’s take a look at the code! Go back to the tab showing the website configuration (keeping the one showing your site open), and click on the “Go to directory” link next to the “Source code” bit in the “Code” section:
You’ll be taken to a different page, showing the contents of the subdirectory of your home directory where your website’s code lives:
Click on the flask_app.py file, and you’ll see the (really really simple) code that defines your Flask app. It looks like this:
It’s worth working through this line-by-line:
from
flask import
Flask
As you’d expect, this loads the Flask framework so that you can use it.
app =
Flask(__name__)
This creates a Flask application to run your code.
@app.route
('/'
)
This decorator specifies that the following function defines what happens when someone goes to the location “/” on your site – eg. if they go to http://yourusername.pythonanywhere.com/. If you wanted to define what happens when they go to http://yourusername.pythonanywhere.com/foo then you’d use @app.route('/foo') instead.
def
hello_world
():
return
'Hello from Flask!'
This simple function just says that when someone goes to the location, they get back the (unformatted) text “Hello from Flask”.
Try changing it – for example, to “This is my new shiny Flask app”. Once you’ve made the change, click the “Save” button at the top to save the file to PythonAnywhere:
…then the reload button (to the far right, looking like two curved arrows making a circle), which stops your website and then starts it again with the fresh code.
A “spinner” will appear next to the button to tell you that PythonAnywhere is working. Once it has disappeared, go to the tab showing the website again, hit the page refresh button, and you’ll see that it has changed as you’d expect.
Step 3: make the processing code available to the web app
Now, we want our Flask app to be able to run our code. We’ve already extracted it into a
function of its own. It’s generally a good idea to keep the web app code – the basic stuff to
display pages – separate from the more complicated processing code (after all, if we were doing the stock analysis
example rather than this simple add-two-numbers script, the processing could be thousands of lines long).
So, we’ll create a new file for our processing code. Go back to the browser tab that’s showing your editor page; up at the top, you’ll see
“breadcrumb” links showing you where the file is stored. They’ll be a series of directory names separated
by “/” characters, each one apart from the last being a link.
The last one, just before the name of the file containing your Flask code,
will probably be mysite. Right-click on that, and open it in a new browser tab – the new tab
will show the directory listing you had before:
In the input near the top right, where it says “Enter new file name, eg. hello.py”, enter the name
of the file that will contain the processing code. Let’s (uninventively) call it processing.py.
Click the “New file” button, and you’ll have another editor window open, showing an empty file.
Copy/paste your processing function into there; that means that the file should simply contain this
code:
def
do_calculation
(number1, number2):
return
number1 +
number2
Save that file, then go back to the tab you kept open that contains the Flask code. At the
top, add a new line just after the line that imports Flask, to import your processing code:
from
processing import
do_calculation
While we’re at it, let’s also add a line to make debugging easier if you have a typo
or other error in the code; just after the line that says
app =
Flask(__name__)
…add this:
app.
config["DEBUG"
] =
True
Save the file; you’ll see that you get a warning icon next to the new import line. If you move your
mouse pointer over the icon, you’ll see the details:
It says that the function was imported but is not being used, which is completely true! That
moves us on to the next step.
Step 4: Accepting input
What we want our site to do is display a page that allows the user to enter two numbers. To do
that, we’ll change the existing function that is run to display the page. Right now we have this:
@app.route
('/'
)
def
hello_world
():
return
'This is my new shiny Flask app'
We want to display more than text, we want to display some HTML. Now, the best way to do HTML in
Flask apps is to use templates (which allow you to keep the Python code that Flask needs in separate files from
the HTML), but we have other tutorials that go into the details of that. In this case
we’ll just put the HTML right there inside our Flask code – and while we’re at it, we’ll rename the
function:
@app.route
('/'
)
def
adder_page
():
return
'''
<html>
<body>
<p>Enter your numbers:</p>
<form>
<p><input name="number1" /></p>
<p><input name="number2" /></p>
<p><input type="submit" value="Do calculation" /></p>
</form>
</body>
</html>
'''
We won’t go into the details of how HTML works here, there are lots of excellent tutorials online
and one that suits the way you learn is just a Google search away. For now, all we need to know is that
where we were previously returning a single-line string, we’re now returning a multi-line one
(that’s what the three quotes in a line mean, in case you’re not familiar with them – one string split
over multiple lines). The multi-line string contains HTML code, which just displays a page
that asks
the user to enter two numbers, and a button that says “Do calculation”. Click on the editor’s
“reload website” button:
…and then check out your website again in the tab that you (hopefully) kept open, and you’ll
see something like this:
However, as we haven’t done anything to wire up the input to the processing, clicking the “Do calculation”
button won’t do anything but reload the page.
Step 5: validating input
We could at this stage go straight to adding on the code to do the calculations, and I was
originally planning to do that here. But after thinking about it, I realised that doing that
would basically be teaching you to shoot yourself in the foot… When you put a website up
on the Internet, you have to allow for the fact that the people using it will make mistakes.
If you created a site that allowed people to enter numbers and add them, sooner or later someone
will type in “wombat” for one of the numbers, or something like that, and it would be embarrassing
if your site responded with an internal server error.
So let’s add on some basic validation – that is, some code that makes sure that people aren’t
providing us with random marsupials instead of numbers.
A good website will, when you enter an invalid input, display the page again with an error message
in it. A bad website will display a page saying “Invalid input, please click the back button
and try again”. Let’s write a good website.
The first step is to change our HTML so that the person viewing the page can click the “Do calculation”
button and get a response. Just change the line that says
<form
>
So that it says this:
<form
method
=
"post"
action
=
"."
>
What that means is that previously we had a form, but now we have a form that has an “action”
telling it that when the button that has the type “submit” is clicked, it should request the same
page as it is already on, but this time it should use the “post” method.
(HTTP methods are extra bits of information that are tacked on to requests that are made
by a browser to a server. The “get” method, as you might expect, means “I just want to get a
page”. The “post” method means “I want to provide the server with some information to store or
process”. There are vast reams of details that I’m skipping over here, but that’s the most
important stuff for now.)
So now we have a way for data to be sent back to the server. Reload the site using the button
in the editor, and refresh the page in the tab where you’re viewing your site. Try entering some
numbers, and click the “Do calculation” button, and you’ll get… an incomprehensible error message:
Well, perhaps not entirely incomprehensible. It says “method not allowed”. Previously we were
using the “get” method to get our page, but we just told the form that it should use the “post” method
when the data was submitted. So Flask is telling us that it’s not going to allow that page to
be requested with the “post” method.
By default, Flask view functions only accept requests using the “get” method. It’s easy to change that.
Back in the code file, where we have this line:
@app.route
('/'
)
…replace it with this:
@app.route
("/"
, methods=
["GET"
, "POST"
])
Save the file, hit the reload button in the editor, then go to the tab showing your page; click back
to get away from the error page if it’s still showing, then enter some numbers and click the
“Do calculation” button again.
You’ll be taken back to the page with no error. Success! Kind of.
Now let’s add the validation code. The numbers that were entered will be made available to us
in our Flask code via the form attribute of a global variable called request. So we can add
validation logic by using that. The first step is to make the request variable available by
importing it; change the line that says
from
flask import
Flask
to say
from
flask import
Flask, request
Now, add this code to the view function, before the return statement:
errors =
""
if
request.
method ==
"POST"
:
number1 =
None
number2 =
None
try
:
number1 =
float(request.
form["number1"
])
except
:
errors +=
"<p>{!r} is not a number.</p>
\n
"
.
format(request.
form["number1"
])
try
:
number2 =
float(request.
form["number2"
])
except
:
errors +=
"<p>{!r} is not a number.</p>
\n
"
.
format(request.
form["number2"
])
Basically, we’re saying that if the method is “post”, we do the validation.
Finally, add some code to put those errors into the page’s HTML; replace the bit that
returns the multi-line string with this:
return
'''
<html>
<body>
{errors}
<p>Enter your numbers:</p>
<form method="post" action=".">
<p><input name="number1" /></p>
<p><input name="number2" /></p>
<p><input type="submit" value="Do calculation" /></p>
</form>
</body>
</html>
'''
.
format(errors=
errors)
This is exactly the same page as before, we’re just interpolating the string that contains
any errors into it just above the “Enter your numbers” header.
Save the file; you’ll see more warnings for the lines where we define
variables called number1 and number2, because we’re not using those variables. We know we’re going
to fix that, so they can be ignored for now.
Reload the site, and head over to the
page where we’re viewing it, and try to add a koala to a wallaby – you’ll get an
appropriate error:
Try adding 23 to 19, however, and you won’t get 42 – you’ll just
get the same input form again. So now, the final step that brings it all together.
Step 6: doing the calculation!
We’re all set up to do the calculation. What we want to do is:
- If the request used a “get” method, just display the input form
- If the request used a “post” method, but one or both of the numbers are not valid, then display the input form with error messages.
- If the request used a “post” method, and both numbers are valid, then display the result.
We can do that
by adding something inside the if request.method == "POST": block, just after we’ve checked
that number2 is valid:
if
number1 is
not
None and
number2 is
not
None:
result =
do_calculation(number1, number2)
return
'''
<html>
<body>
<p>The result is {result}</p>
<p><a href="/">Click here to calculate again</a>
</body>
</html>
'''
.
format(result=
result)
Adding that code should clear out all of the warnings in the editor page, and if you reload your
site and then try using it again, it should all work fine!
Pause for breath…
So if all has gone well, you’ve now converted a simple script that could add two numbers
into a simple website that lets other people add numbers. If you’re getting error messages,
it’s well worth trying to debug them yourself to find out where any typos came in. An
excellent resource is the website’s error log; there’s a link on the “Web” page:
…and the most recent error will be at the bottom:
That error message is telling me that I mistyped “flask” as “falsk”, and the traceback
tells me exactly which line the typo is on.
However, if you get completely stuck, here’s the code you should currently have:
from
flask import
Flask, request
from
processing import
do_calculation
app =
Flask(__name__)
app.
config["DEBUG"
] =
True
@app.route
("/"
, methods=
["GET"
, "POST"
])
def
adder_page
():
errors =
""
if
request.
method ==
"POST"
:
number1 =
None
number2 =
None
try
:
number1 =
float(request.
form["number1"
])
except
:
errors +=
"<p>{!r} is not a number.</p>
\n
"
.
format(request.
form["number1"
])
try
:
number2 =
float(request.
form["number2"
])
except
:
errors +=
"<p>{!r} is not a number.</p>
\n
"
.
format(request.
form["number2"
])
if
number1 is
not
None and
number2 is
not
None:
result =
do_calculation(number1, number2)
return
'''
<html>
<body>
<p>The result is {result}</p>
<p><a href="/">Click here to calculate again</a>
</body>
</html>
'''
.
format(result=
result)
return
'''
<html>
<body>
{errors}
<p>Enter your numbers:</p>
<form method="post" action=".">
<p><input name="number1" /></p>
<p><input name="number2" /></p>
<p><input type="submit" value="Do calculation" /></p>
</form>
</body>
</html>
'''
.
format(errors=
errors)
The next step – multi-phase scripts
So now that we’ve managed to turn a script that had the simple three-phase
input-process-output structure into a website, how about handling the more complicated
case where you have more phases? A common case is where you have an indefinite
number of inputs, and the output depends on all of them. For example, here’s
a simple script that will allow you to enter a list of numbers, one after another,
and then will display
the statistical mode (the most common number) in the list, with an appropriate error
message if there is no most common number (for example in the list [1, 2, 3, 4]).
import
statistics
def
calculate_mode
(number_list):
try
:
return
"The mode of the numbers is {}"
.
format(statistics.
mode(number_list))
except
statistics.
StatisticsError as
exc:
return
"Error calculating mode: {}"
.
format(exc)
inputs =
[]
while
True:
if
len(inputs) !=
0
:
print
("Numbers so far:"
)
for
input_value in
inputs:
print
(input_value)
value =
input("Enter a number, or just hit return to calculate: "
)
if
value ==
""
:
break
try
:
inputs.
append(float(value))
except
:
print
("{} is not a number"
)
print
(calculate_mode(inputs))
How can we turn that into a website? We could display, say, 100 input fields and let
the user leave the ones they don’t want blank, but (a) that would look hideous,
and (b) it would leave people who wanted to get the mode of 150 numbers stuck.
(Let’s put aside for the moment the fact that entering lots of numbers into a website
would be deathly dull – there’s a solution coming for that 🙂
What we need is a page that can accumulate numbers; the user enters the first,
then clicks a button to send it to the server, which puts it in a list somewhere.
Then they enter the next, and the server adds that one to the list. Then the next,
and so on, until they’re finished, at which point they click a button to get the result.
Here’s a naive implementation. By “naive”, I mean that it sort of works in some cases,
but doesn’t in general; it’s the kind of thing that one might write, only to discover
that when other people start using it, it breaks in really weird and confusing ways.
It’s worth going through, though, because the way in which is is wrong is instructive.
Firstly, in our processing.py file we have the processing code, just as before:
import
statistics
def
calculate_mode
(number_list):
try
:
return
"The mode of the numbers is {}"
.
format(statistics.
mode(number_list))
except
statistics.
StatisticsError as
exc:
return
"Error calculating mode: {}"
.
format(exc)
That should be pretty clear. Now, in flask_app.py we have the following code:
(A step-by-step explanation is coming later, but it’s worth reading through now to see
if you can see how at least some of it it works.)
from
flask import
Flask, request
from
processing import
calculate_mode
app =
Flask(__name__)
app.
config["DEBUG"
] =
True
inputs =
[]
@app.route
("/"
, methods=
["GET"
, "POST"
])
def
mode_page
():
errors =
""
if
request.
method ==
"POST"
:
try
:
inputs.
append(float(request.
form["number"
]))
except
:
errors +=
"<p>{!r} is not a number.</p>
\n
"
.
format(request.
form["number"
])
if
request.
form["action"
] ==
"Calculate number"
:
result =
calculate_mode(inputs)
inputs.
clear()
return
'''
<html>
<body>
<p>{result}</p>
<p><a href="/">Click here to calculate again</a>
</body>
</html>
'''
.
format(result=
result)
if
len(inputs) ==
0
:
numbers_so_far =
""
else
:
numbers_so_far =
"<p>Numbers so far:</p>"
for
number in
inputs:
numbers_so_far +=
"<p>{}</p>"
.
format(number)
return
'''
<html>
<body>
{numbers_so_far}
{errors}
<p>Enter your number:</p>
<form method="post" action=".">
<p><input name="number" /></p>
                    <p><input type="submit" name="action" value="Add another" /></p>
                    <p><input type="submit" name="action" value="Calculate number" /></p>
</form>
</body>
</html>
'''
.
format(numbers_so_far=
numbers_so_far, errors=
errors)
All clear? Maybe… It does work, though, sort of. Let’s try it – copy the code for
the two files into your editor tabs, reload the site, and give it a go. If you have a free
account, it will work!
Enter “1”, and you get this:
Enter some more numbers:
…and calculate the result:
But if you have a paid account, you’ll see some weird behaviour. Exactly what you’ll
get will depend on various random factors, but it will be something like this:
Enter 1, and you might get this:
Enter 2, and you might get this:
Huh? Where did the “1” go? Well, let’s enter “3”:
Well, that seems to have worked. We’ll add “4”:
And now we’ll add “1” again:
So now our original 1 has come back, but all of the other numbers have disappeared.
In general, it will seem to sometimes forget numbers, and then remember them again
later, as if it has multiple lists of numbers – which is exactly what it does.
Before we go into why it’s actually wrong (and why, counterintuitively, it works worse on a
paid account than on a free one), here’s the promised step-by-step runthrough,
with comments after each block of code. Starting off:
from
flask import
Flask, request
from
processing import
calculate_mode
app =
Flask(__name__)
app.
config["DEBUG"
] =
True
All that is just copied from the previous website.
inputs =
[]
We’re initialising a list for our inputs, and putting it in the global scope, so that
it will persist over time. This is because each view of our page will involve a call to
the view function:
@app.route
("/"
, methods=
["GET"
, "POST"
])
def
mode_page
():
…which is exactly the same kind of setup for a view function as we had before.
errors =
""
if
request.
method ==
"POST"
:
try
:
inputs.
append(float(request.
form["number"
]))
except
:
errors +=
"<p>{!r} is not a number.</p>
\n
"
.
format(request.
form["number"
])
We do very similar validation to the number as we did in our last website, and
if the number is valid we add it to the global list.
if
request.
form["action"
] ==
"Calculate number"
:
This bit is a little more tricky. On our page, we have two buttons – one to add a number, and
one to say “do the calculation” – here’s the bit of the HTML code from further down that specifies
them:
<p
><input
type
=
"submit"
name
=
"action"
value
=
"Add another"
/></p
>
<p
><input
type
=
"submit"
name
=
"action"
value
=
"Calculate number"
/></p
>
This means that when we get a post request from a browser, the “action” value in the form
object will contain the text of the submit button that was actually clicked.
So, if the “Calculate number” button was the one that the user clicked…
result =
calculate_mode(inputs)
inputs.
clear()
return
'''
<html>
<body>
<p>{result}</p>
<p><a href="/">Click here to calculate again</a>
</body>
</html>
'''
.
format(result=
result)
…we do the calculation and return the result (clearing the list of the inputs at the same
time so that the user can try again with another list).
If, however, we get past that if request.form["action"] == "Calculate number" statement, it means either that:
- The request was using the post method, and we’ve just added a number to the list or set the error string to reflect the fact that the user entered an invalid number, or
- The request was using the get method
So:
if
len(inputs) ==
0
:
numbers_so_far =
""
else
:
numbers_so_far =
"<p>Numbers so far:</p>"
for
number in
inputs:
numbers_so_far +=
"<p>{}</p>"
.
format(number)
…we generate a list of the numbers so far, if there are any, and then:
return
'''
<html>
<body>
{numbers_so_far}
{errors}
<p>Enter your number:</p>
<form method="post" action=".">
<p><input name="number" /></p>
<p><input type="submit" name="action" value="Add another" /></p>
<p><input type="submit" name="action" value="Calculate number" /></p>
</form>
</body>
</html>
'''
.
format(numbers_so_far=
numbers_so_far, errors=
errors)
We return our page asking for a number, with the list of numbers so far and errors if either is applicable.
Phew!
So why is it incorrect? If you have a paid account, you’ve already seen evidence that it doesn’t
work very well. If you have a free account, here’s a thought experiment – what if two people
were viewing the site at the same time? In fact, you can see exactly what would happen if you
use the “incognito” or “private tab” feature on your browser – or, if you have multiple browsers
installed, if you use two different browsers (say by visiting the site in Chrome and in Firefox at
the same time).
What you’ll see is that both users are sharing a list of numbers. The Chrome user starts off,
and adds a number to the list:
Now the Firefox user adds a number – but they see not only the number they added, but also the
Chrome user’s number:
It’s pretty clear what’s going on here. There’s one server handling the requests from both users,
so there’s only one list of inputs – so everyone shares the same list.
But what about the situation for websites running on paid accounts? If you’ll remember, it looked
like the opposite was going on there – there were multiple lists, even within the same browser.
This is because paid accounts have multiple servers for the same website. This is a good thing,
it means that if they get lots of requests coming in at the same time, then everything gets processed
more quickly – so they can have higher-traffic websites. But it also means that different requests,
even successive requests from the same browser, can wind up going to different servers, and because
each server has its own list, the browser will see one list for one request, but see a different
list on the next request.
What this all means is that global variables don’t work for storing state in website code.
On each server that’s running to control your site, everyone will see the same global variables.
And if you have multiple servers, then each one will have a different set of global variables.
What to do?
Sessions to the rescue!
What we need is a way to keep a set of “global” variables that are specific to each person viewing
the site, and are shared between all servers. If two people, Alice and Bob, are using the site,
then Alice will have her own list of inputs, which all servers can see, and Bob will have a different
list of inputs, separate from Alice’s but likewise shared between servers.
The web dev mechanism for this is called sessions, and is built into Flask. Let’s make a tiny
set of modifications to the Flask app to make it work properly. Firstly, we’ll import support
for sessions by changing our Flask import line from this:
from
flask import
Flask, request
…to this:
from
flask import
Flask, request, session
In order to use sessions, we’ll also need to configure Flask with a “secret key” – sessions
use cryptography, which requires a random number. Add a line like this just after the line
where we configure Flask’s debug setting to be True:
app.
config["SECRET_KEY"
] =
"lkmaslkdsldsamdlsdmasldsmkdd"
Use a different string to the one I put above; mashing the keyboard randomly is a good way to get a
reasonably random string, though if you want to do things properly, find something truly random.
Next, we’ll get rid of
the global inputs list by deleting this line:
inputs =
[]
Now we’ll use an inputs list that’s stored inside the session object (which looks like
a dictionary) instead of using our global variable. Firstly,
let’s makes sure that whenever we’re in our view function, we have a list of inputs associated
with the current session if there isn’t one already. Right at the start of the view function,
add this:
if
"inputs"
not
in
session:
session["inputs"
] =
[]
Next, inside the bit of code where we’re adding a number to the inputs list, replace this line:
inputs.
append(float(request.
form["number"
]))
…with this one that uses the list on the session:
session["inputs"
].
append(float(request.
form["number"
]))
There’s also a subtlety here; because we’re changing a list inside a session (instead of adding a
new thing to the session), we need to tell the session object that it has changed by putting
this line immediately after the last one:
session.
modified =
True
Next, when we’re calculating the mode, we need to look at our session again to get the list of
inputs:
result =
calculate_mode(inputs)
…becomes
result =
calculate_mode(session["inputs"
])
…and the line that clears the inputs so that the user can do another list likewise changes
from
inputs.
clear()
to:
session["inputs"
].
clear()
session.
modified =
True
Finally, the code that generates the “numbers so far” list at the start of the page needs to change
to use the session:
if
len(inputs) ==
0
:
numbers_so_far =
""
else
:
numbers_so_far =
"<p>Numbers so far:</p>"
for
number in
inputs:
numbers_so_far +=
"<p>{}</p>"
.
format(number)
…becomes:
if
len(session["inputs"
]) ==
0
:
numbers_so_far =
""
else
:
numbers_so_far =
"<p>Numbers so far:</p>"
for
number in
session["inputs"
]:
numbers_so_far +=
"<p>{}</p>"
.
format(number)
Once all of those code changes have been done, you should have this:
from
flask import
Flask, request, session
from
processing import
calculate_mode
app =
Flask(__name__)
app.
config["DEBUG"
] =
True
app.
config["SECRET_KEY"
] =
"lkmaslkdsldsamdlsdmasldsmkdd"
@app.route
("/"
, methods=
["GET"
, "POST"
])
def
mode_page
():
if
"inputs"
not
in
session:
session["inputs"
] =
[]
errors =
""
if
request.
method ==
"POST"
:
try
:
session["inputs"
].
append(float(request.
form["number"
]))
session.
modified =
True
except
:
errors +=
"<p>{!r} is not a number.</p>
\n
"
.
format(request.
form["number"
])
if
request.
form["action"
] ==
"Calculate number"
:
result =
calculate_mode(session["inputs"
])
session["inputs"
].
clear()
session.
modified =
True
return
'''
<html>
<body>
<p>{result}</p>
<p><a href="/">Click here to calculate again</a>
</body>
</html>
'''
.
format(result=
result)
if
len(session["inputs"
]) ==
0
:
numbers_so_far =
""
else
:
numbers_so_far =
"<p>Numbers so far:</p>"
for
number in
session["inputs"
]:
numbers_so_far +=
"<p>{}</p>"
.
format(number)
return
'''
<html>
<body>
{numbers_so_far}
{errors}
<p>Enter your number:</p>
<form method="post" action=".">
<p><input name="number" /></p>
<p><input type="submit" name="action" value="Add another" /></p>
<p><input type="submit" name="action" value="Calculate number" /></p>
</form>
</body>
</html>
'''
.
format(numbers_so_far=
numbers_so_far, errors=
errors)
Hit the reload button, and give it a try! If you have a paid account, you’ll find that now
it all works properly – and if you have a free account, you’ll see that separate browsers now
have separate lists of numbers 🙂
So now we have a multi-user website that keeps state around between page visits.
Processing files
Now, entering all of those numbers one-by-one would be tedious if there were a lot of them.
A lot of Python scripts don’t request the user to enter data a line at a time; they take a
file as their input, process it, and produce a file as the output. Here’s a simple script
that asks for an input filename and an output filename. It expects the input file to contain
a number of lines, each with a comma-separated list of numbers on it. It writes to the
output file the same number of lines, each one containing the sum of the numbers from the
equivalent line in the input file.
def
process_data
(input_data):
result =
""
for
line in
input_data.
splitlines():
if
line !=
""
:
numbers =
[float(n.
strip()) for
n in
line.
split(","
)]
result +=
str(sum(numbers))
result +=
"
\n
"
return
result
input_filename =
input("Enter the input filename: "
)
output_filename =
input("Enter the output filename: "
)
with
open(input_filename, "r"
) as
input_file:
input_data =
input_file.
read()
with
open(output_filename, "w"
) as
output_file:
output_file.
write(process_data(input_data))
What we want is a Flask app that will allow the user to upload a file like the input
file that that script requires, and will then provide the output file to download. This is actually
pretty similar to the original app we did – there’s just three phases, input-process-output. So
the Flask app looks very similar.
Firstly, we put our calculating routine into processing.py, as normal:
def
process_data
(input_data):
result =
""
for
line in
input_data.
splitlines():
if
line !=
""
:
numbers =
[float(n.
strip()) for
n in
line.
split(","
)]
result +=
str(sum(numbers))
result +=
"
\n
"
return
result
…and now we write a Flask app that looks like this:
from
flask import
Flask, make_response, request
from
processing import
process_data
app =
Flask(__name__)
app.
config["DEBUG"
] =
True
@app.route
("/"
, methods=
["GET"
, "POST"
])
def
file_summer_page
():
if
request.
method ==
"POST"
:
input_file =
request.
files["input_file"
]
input_data =
input_file.
stream.
read().
decode("utf-8"
)
output_data =
process_data(input_data)
response =
make_response(output_data)
response.
headers["Content-Disposition"
] =
"attachment; filename=result.csv"
return
response
    return '''
        <html>
            <body>
                <p>Select the file you want to sum up:</p>
                <form method="post" action="." enctype="multipart/form-data">
                    <p><input type="file" name="input_file" /></p>
                    <p><input type="submit" value="Process the file" /></p>
                </form>
            </body>
        </html>
    '''
Again, we’ll go through that bit-by-bit in a moment (though it’s worth noting that
although this feels like something that should be much harder than the first case, the
Flask app is much shorter 🙂 But let’s try it out first – once you’ve saved the
code on PythonAnywhere and reloaded the site, visit the page:
We specify a file with contents (mine just has “1, 2, 3” on the first line and “4, 5, 6” on the
second):
…then we click the button. You’ll have to watch for it, but a file download will
almost immediately start. In Chrome, for example, this will appear at the bottom
of the window:
Open the file in an appropriate application – here’s what it looks like in gedit:
We’ve got a website where we can upload a file, process it, and download the results 🙂
Obviously the user interface could use a bit of work, but that’s left as an exercise for
the reader…
So, how dow the code work? Here’s the breakdown:
from
flask import
Flask, make_response, request
from
processing import
process_data
app =
Flask(__name__)
app.
config["DEBUG"
] =
True
This is our normal Flask setup code.
@app.route
("/"
, methods=
["GET"
, "POST"
])
def
file_summer_page
():
As usual, we define a view.
if
request.
method ==
"POST"
:
If the request is use the “post” method…
input_file =
request.
files["input_file"
]
input_data =
input_file.
stream.
read().
decode("utf-8"
)
…we ask Flask to extract the uploaded file from the request object, and then
we read it into memory. The file it will provide us with will be in binary format,
so we convert it into a string, assuming that it’s in the UTF-8 character set.
output_data =
process_data(input_data)
Now we process the data using our function. The next step is where it gets a little more
complicated:
response =
make_response(output_data)
response.
headers["Content-Disposition"
] =
"attachment; filename=result.csv"
In the past, we just returned strings from our Flask view functions and let it sort out
how that should be presented to the browser. But this time, we want to take a little
more control over the kind of response that’s going back. In particular, we don’t want
to dump all of the output into the browser window so that the user has to copy/paste the
(potentially thousands of lines of) output into their spreadsheet or whatever. Instead,
we want to tell the browser “the thing I’m sending you is a file called ‘result.csv’, so
please download it appropriately”. That’s what these two lines do – the first is just a
way to tell Flask that we’re going to need some detailed control over the response, and
the second does that control. Next:
return
response
…we just return the response.
Now that we’re out of that first if statement, we know that the request we’re handling
isn’t one with a “post” method, so it must be a “get”. So we display the form:
return
'''
<html>
<body>
<p>Select the file you want to sum up:</p>
<form method="post" action="." enctype="multipart/form-data">
<p><input type="file" name="input_file" /></p>
<p><input type="submit" value="Process the file" /></p>
</form>
</body>
</html>
'''
In this case we just return a string of HTML like we did in the previous examples. There are
only two new things in there:
<form
method
=
"post"
action
=
"."
enctype
=
"multipart/form-data"
>
The enctype="multipart/form-data" in there is just an extra flag that is needed to tell
the browser how to format files when it uploads them as part of the “post” request that it’s sending
to the server, and:
<p
><input
type
=
"file"
name
=
"input_file"
/></p
>
….is just how you specify an input where the user can select a file to upload
So that’s it!
And we’re done
In this blog post we’ve presented three different Flask apps, each of which shows how a specific
kind of normal Python script can be converted into a website that other people can access to
reap the benefits of the code you’ve written.
Hopefully they’re all reasonably clear, and you can see how you could apply the same techniques
to your own scripts. If you have any comments or questions, please post them in the comments
below – and if you have any thoughts about other kinds of patterns that we could consider
adding to an updated version of this post, or to a follow-up, do let us know.
Thanks for reading!
[Update 2020-11-09: many thanks to commenter clearerinday for raising some
issues that they encountered in the last example when using a Windows machine –
we’ve fixed the code above to handle that better.]
[Update] Scheduling Web Scrapers on the PythonAnywhere Cloud (Scrapy Part 2) | pythonanywhere – Australia.xemloibaihat
(Note: This post is part of my reddit-scraper series)
Summary
- Running Scrapy spider as a script
- Scheduling script to run on PythonAnywhere cloud
Previously on Siv Scripts, we created a web scraping pipeline to pull Top Posts from Reddit and store them in a MongoDB collection. At this stage, we still have to manually execute our crawler via the command-line interface (CLI) each time we want to scrape Reddit.
Cue Raymond Hettinger: There MUST be a better way!
And there is!
In this post, we will convert our command-line Scrapy application into a script that we will schedule to run on the Python Anywhere cloud platform. In addition, we will use our top_post_emailer module to automatically send ourselves an email digest of the data that was scraped.
What You Need to Follow Along
Development Tools (Stack)
- Python 3.5
- PythonAnywhere account
- MongoDB
- Cloud accessible installation — MLab
- Free Sandbox plan provides single database with 0.5 GB storage on a shared VM
- MailGun account
- Free account is limited to 10K emails per month, more than enough for our purposes
Code
We can checkout the code from the git repository as follows:
$
git checkout tags/blog-scrapy-part2Note: checking out 'tags/blog-scrapy-part2'.
Or we can use GitZip to download the tagged commit by URL.
Setting up MongoDB on mLab
Up until now we have been using a local instance of MongoDB to store our scraped data. Since we will be running our scraper on the cloud, we will also need to create an online instance of our database where we can store data.
Head over to mLab to create an account and set up a collection in our sandbox database to store the data.
Let’s initialize our MongoDB collection with documents from our local collection. From the MongoDB docs:
$
mongoexport --db sivji-sandbox --collection top_reddit_posts --out20170322
-reddit-posts.json2017-03-22T23:18:39.404-0500 connected to: localhost
2017-03-22T23:18:39.429-0500 exported 751 records
$
mongoimport -h <mlab-url>:port -d sivji-sandbox -c top_reddit_posts -u <dbuser> -p <dbpass> --file20170322
-reddit-posts.json2017-03-22T23:21:14.075-0500 connected to: <mlab-url>:port
2017-03-22T23:21:15.504-0500 imported 751 documents
We can use MongoDB Compass to view our mLab instance and create indexes for our collection. I covered how to do this in a previous post.
Running Scrapy From a Script
Currently we run our spider using the scrapy crawl command via Scrapy’s CLI. Looking through the Scrapy documentation, we see that we can utilize Scrapy’s API and run our scraper as a script.
In our Scrapy directory, let’s add the following file:
# app.py (v1)
"""Script to crawl Top Posts across sub reddits and store results in MongoDB
"""
from
scrapy.crawler
import
CrawlerProcess
from
reddit.spiders
import
PostSpider
if
__name__
==
'__main__'
:
process
=
CrawlerProcess
(
get_project_settings
())
process
.
crawl
(
PostSpider
)
process
.
start
()
# the script will block here until the crawling is finished
Let’s also take this opportunity to modify our Scrapy project to use our mLab MongoDB instance. This will require us to change the following files:
# settings.py
import
os
import
configparser
# ...
# Configure item pipelines
# See http://scrapy.readthedocs.org/en/latest/topics/item-pipeline.html
ITEM_PIPELINES
=
{
'reddit.pipelines.MongoPipeline'
:
300
,
}
## get mongodb params (using configparser)
config
=
configparser
.
ConfigParser
()
config
.
read
(
os
.
path
.
join
(
os
.
path
.
abspath
(
os
.
path
.
dirname
(
__file__
)),
'settings.cfg'
))
mlab_uri
=
config
.
get
(
'MongoDB'
,
'mlab_uri'
)
MONGO_URI
=
mlab_uri
MONGO_DATABASE
=
'sivji-sandbox'
# ...
# top_post_emailer/settings.cfg
[
MongoDB
]
mlab_uri
=
[
Your
mLab
URI
here
]
Our Scrapy project folder should have the following structure:
.
├── app.py
│ ├── __init__.py
│ ├── items.py
│ ├── middlewares.py
│ ├── pipelines.py
│ ├── settings.cfg
│ ├── settings.py
│ └── spiders
│ └── __init__.py
└── scrapy.cfg
We can execute our Reddit Top Posts scraper as a script by running app.py in a Python interpreter.
Aside: Testing Web Scrapers
How should we test web scrapers?
We could download an offline copy of the webpage we are scraping and use that to test changes to our parse() method. Let’s think about this a bit more: what happens if the website changes its layout and our offline copy becomes stale? A StackOverflow (Praise Be) user suggested a good workflow for this situation.
We could also consider utilizing Spider contracts to check if we are getting expected results for a specified URL. Be aware of the limitations and issues with contracts.
We will not be implementing any kind of unit tests for this scraper. The Reddit layout is more-or-less static. If the website changes, we will notice this in the email digests we receive and we can make the necessary modifications at that time. For projects that are a bit more critical than our toy scraper, we should probably set up unit tests as described above.
import Email Functionality
In a previous post, we created the top_post_emailer to send ourselves email digests. Let’s import this package and wire it into our script.
If you followed the previous post, copy the top_post_emailer folder into the Scrapy project folder. If you do not already have this package, you can download this folder from Github using GitZip and extract it into the Scrapy project folder.
Since we are using mLab as our database, we will need to update the following files:
# top_post_emailer/__init__.py
import
os
import
configparser
from
mongoengine.connection
import
connect
from
.data_model
import
Post
from
.render_template
import
render
from
.mailgun_emailer
import
send_email
def
email_last_scraped_date
():
## mongodb params (using configparser)
config
=
configparser
.
ConfigParser
()
config
.
read
(
os
.
path
.
join
(
os
.
path
.
abspath
(
os
.
path
.
dirname
(
__file__
)),
'settings.cfg'
))
mlab_uri
=
config
.
get
(
'MongoDB'
,
'mlab_uri'
)
# connect to db
MONGO_URI
=
mlab_uri
connect
(
'sivji-sandbox'
,
host
=
MONGO_URI
)
## get the last date the webscraper was run
for
post
in
Post
.
objects
()
.
fields
(
date_str
=
1
)
.
order_by
(
'-date_str'
)
.
limit
(
1
):
day_to_pull
=
post
.
date_str
## pass in variables, render template, and send
context
=
{
'day_to_pull'
:
day_to_pull
,
'Post'
:
Post
,
}
html
=
render
(
"template.html"
,
context
)
send_email
(
html
)
# top_post_emailer/settings.cfg
[
MailGun
]
api
=
[
Your
MailGun
API
key
here
]
domain
=
[
Your
MailGun
domain
here
]
[
MongoDB
]
mlab_uri
=
[
Your
mLab
URI
here
]
Let’s add email functionality to our script:
# app.py (v2 - final version)
"""Script to crawl Top Posts across sub reddits and store results in MongoDB
"""
import
logging
from
datetime
import
date
from
scrapy.utils.project
import
get_project_settings
from
scrapy.crawler
import
CrawlerProcess
from
reddit.spiders
import
PostSpider
from
top_post_emailer
import
email_last_scraped_date
if
__name__
==
'__main__'
:
logging
.
basicConfig
(
level
=
logging
.
INFO
)
logger
=
logging
.
getLogger
(
__name__
)
# only run on saturdays (once a week)
if
date
.
strftime
(
date
.
today
(),
'%A'
)
.
lower
()
==
'saturday'
:
crawler
=
CrawlerProcess
(
get_project_settings
())
crawler
.
crawl
(
PostSpider
)
crawler
.
start
()
# the script will block here until the crawling is finished
email_last_scraped_date
()
logger
.
info
(
'Scrape complete and email sent.'
)
else
:
logger
.
info
(
'Script did not run.'
)
Note
- We used the Python
loggingmodule to provide additional details on the innerworkings of our application. Another fantastic tool available in the Python Standard Library. Batteries are included
PythonAnywhere
In this section we will explore the PythonAnywhere cloud platform, set up a Python virtual environment for our scraper, and configure the PythonAnywhere scheduler to run our Scrapy script.
Overview
From the website:
PythonAnywhere makes it easy to create and run Python programs in the cloud. You can write your programs in a web-based editor or just run a console session from any modern web browser. There’s storage space on our servers, and you can preserve your session state and access it from anywhere, with no need to pay for, or configure, your own server. Start work on your work desktop, then later pick up from where you left off by accessing exactly the same session from your laptop.
What does this mean? For 5 bucks a month, we can host websites and schedule batch jobs in a fully configurable Python environment.
More information can be found on their website and Episode 10 of the Talk Python to Me podcast.
Setting Up Environment
After you create an account, you will need to open up a Bash console:
virtualenv and pip
Now we will set up a virtualenv and pip install required packages:
11:06 ~ $
mkvirtualenv scrapy36 --python=
/usr/bin/python3.6Running virtualenv with interpreter /usr/bin/python3.6
Using base prefix '/usr'
New python executable in /home/pythonsivji/.virtualenvs/scrapy36/bin/python3.6
Also creating executable in /home/pythonsivji/.virtualenvs/scrapy36/bin/python
Installing setuptools, pip, wheel...done.
virtualenvwrapper.user_scripts creating /home/pythonsivji/.virtualenvs/scrapy36/bin/predeactivate
virtualenvwrapper.user_scripts creating /home/pythonsivji/.virtualenvs/scrapy36/bin/postdeactivate
virtualenvwrapper.user_scripts creating /home/pythonsivji/.virtualenvs/scrapy36/bin/preactivate
virtualenvwrapper.user_scripts creating /home/pythonsivji/.virtualenvs/scrapy36/bin/postactivate
virtualenvwrapper.user_scripts creating /home/pythonsivji/.virtualenvs/scrapy36/bin/get_env_details
(scrapy36) 11:08 ~ $ which python
/home/pythonsivji/.virtualenvs/scrapy36/bin/python
(scrapy36) 11:08 ~ $ pip install scrapy mongoengine jinja2 requests
Collecting scrapy
Downloading Scrapy-1.3.3-py2.py3-none-any.whl (240kB)
100% |████████████████████████████████| 245kB 2.2MB/s
Collecting mongoengine
Downloading mongoengine-0.11.0.tar.gz (352kB)
100% |████████████████████████████████| 358kB 1.8MB/s
Collecting jinja2
Collecting requests
... additional rows ommitted ...
Additional Resources
Uploading code into PythonAnywhere
There are many ways to get code in and out of PythonAnywhere. We will be uploading our local project folder to Github and then cloning our repo into PythonAnywhere as follows:
(scrapy36) 23:50 ~ $ mkdir siv-dev && cd siv-dev
(scrapy36) 23:51 ~/siv-dev $ git clone https://github.com/alysivji/reddit-top-posts-scrapy.git
Cloning into 'reddit-top-posts-scrapy'...
remote: Counting objects: 63, done.
remote: Compressing objects: 100% (23/23), done.
remote: Total 63 (delta 9), reused 0 (delta 0), pack-reused 39
Unpacking objects: 100% (63/63), done.
Checking connectivity... done.
Notes
- Creating a git repo is not covered here. There are plenty of online resources available that cover this topic in the requisite detail. Relevant xkcd
- Make sure you add
settings.cfgto your.gitignorefile if you are using a public repo. In this case, you will need to manually upload thesettings.cfgfiles into their respective folders
Set up Scheduler
In order to run a scheduled task in a virtualenv, we require the full path to the virtualenv’s Python. We can get this as follows:
(scrapy36) 23:52 ~/siv-dev/reddit-top-posts-scrapy (master)$ which python
/home/pythonsivji/.virtualenvs/scrapy36/bin/python
(scrapy36) 23:54 ~/siv-dev/reddit-top-posts-scrapy (master)$ pwd
/home/pythonsivji/siv-dev/reddit-top-posts-scrapy
Now we will create a bash script to cd into our project directory and execute the Scrapy script:
# ./run_reddit_scraper
#!/bin/bash
# scrapy project files require us to be in the project folder to load settings
# run with scrapy virtualenv
cd
/home/pythonsivji/siv-dev/reddit-top-posts-scrapy/"/home/pythonsivji/.virtualenvs/scrapy36/bin/python"
app.py
In the console, we will need to change permissions to make our newly-created file executable:
$
chmod755
run_reddit_scraper
Next, we schedule the following command to run Daily at 10:00 UTC:
./run_reddit_scraper
The Schedule dashboard should look as follows:
Monitoring Runtime
Let’s take a look at the log to make sure everything is working:
... additional rows omitted ...
DEBUG:root:Post added to MongoDB
2017-04-01 14:45:29 [root] DEBUG: Post added to MongoDB
DEBUG:scrapy.core.scraper:Scraped from <200 https://www.reddit.com/r/MachineLearning/top/?sort=top&t=week>
{'commentsUrl': 'https://www.reddit.com/r/MachineLearning/comments/61kym3/p_poker_hand_classification_advice_needed/',
 'date': datetime.datetime(2017, 4, 1, 14, 45, 29, 385712),
 'date_str': '2017-04-01',
 'score': 24,
 'sub': 'MachineLearning',
 'title': '[P] Poker hand classification, advice needed',
 'url': 'https://www.reddit.com/r/MachineLearning/comments/61kym3/p_poker_hand_classification_advice_needed/'}
INFO:scrapy.core.engine:Closing spider (finished)
2017-04-01 14:45:29 [scrapy.core.engine] INFO: Closing spider (finished)
2017-04-01 14:45:29 [scrapy.statscollectors] INFO: Dumping Scrapy stats:
{'downloader/request_bytes': 2388,
 'downloader/request_count': 7,
 'downloader/request_method_count/GET': 7,
 'downloader/response_bytes': 101355,
 'downloader/response_count': 7,
 'downloader/response_status_count/200': 5,
 'downloader/response_status_count/301': 2,
 'finish_reason': 'finished',
 'finish_time': datetime.datetime(2017, 4, 1, 14, 45, 29, 398366),
 'item_scraped_count': 100,
 'log_count/DEBUG': 208,
 'log_count/INFO': 7,
 'response_received_count': 5,
 'scheduler/dequeued': 6,
 'scheduler/dequeued/memory': 6,
 'scheduler/enqueued': 6,
 'scheduler/enqueued/memory': 6,
 'start_time': datetime.datetime(2017, 4, 1, 14, 45, 26, 699177)}
INFO:scrapy.core.engine:Spider closed (finished)
2017-04-01 14:45:29 [scrapy.core.engine] INFO: Spider closed (finished)
DEBUG:requests.packages.urllib3.connectionpool:Starting new HTTPS connection (1): api.mailgun.net
2017-04-01 14:45:29 [requests.packages.urllib3.connectionpool] DEBUG: Starting new HTTPS connection (1): api.mailgun.net
DEBUG:requests.packages.urllib3.connectionpool:https://api.mailgun.net:443 "POST /v3/sandbox024e4bcae7814311932f6e9569cea611.mailgun.org/messages HTTP/1.1" 200 138
2017-04-01 14:45:30 [requests.packages.urllib3.connectionpool] DEBUG: https://api.mailgun.net:443 "POST /v3/sandbox024e4bcae7814311932f6e9569cea611.mailgun.org/messages HTTP/1.1" 200 138
INFO:__main__:Scrape complete and email sent.
2017-04-01 14:45:30 [__main__] INFO: Scrape complete and email sent.
Success!

2017-04-01 14:45:30 -- Completed task, took 11.00 seconds, return code was 0.
Was the email digest sent?
And we’re done!
Conclusion
In this post, we refactored our Reddit Top Posts web scraper to automatically run on the PythonAnywhere cloud. Now that our data collection process is automated, we just have to monitor emails to ensure the script is working as intended.
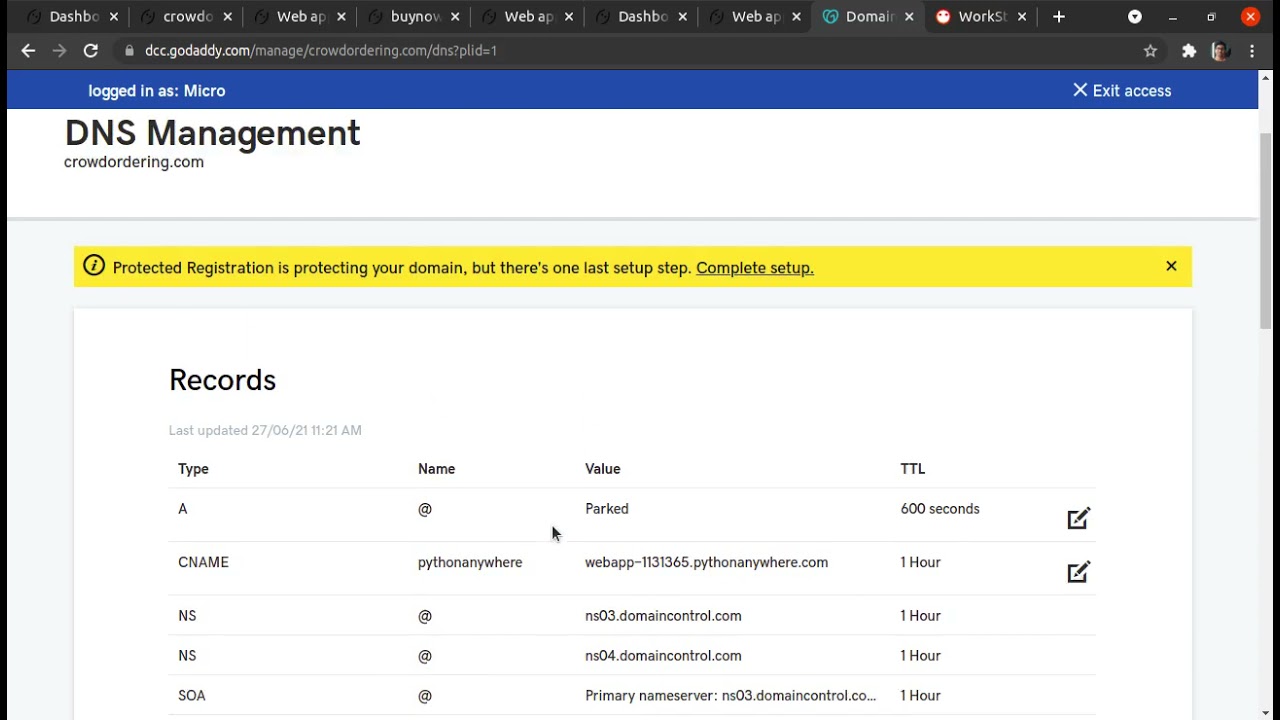
06 GoDaddy CNAME Setup for PythonAnyWhere website.
In this video, I set up a custom domain name for the website hosted on pythonanywhere by configuring the CNAME on GoDaddy.
นอกจากการดูบทความนี้แล้ว คุณยังสามารถดูข้อมูลที่เป็นประโยชน์อื่นๆ อีกมากมายที่เราให้ไว้ที่นี่: ดูเพิ่มเติม
Stockfish 14.1 NNUE vs Santa Claus!
Happy holidays, everyone!! For today’s video, Stockfish 14.1 NNUE Takes on the one and only Santa Claus in a game of chess! Who will come out on top? 😀
Follow me on Twitter! https://www.twitter.com/JoeKempsey
Check out Stockfish 14.1! https://stockfishchess.org
If you wish to use Stockfish, you will need a GUI (graphical user interface) to run it on. I use Lucas Chess which is free (I use laptop with windows), if you use Mac Stockfish has its own app you can download to use it (see Stockfish link above!) Here’s link to download Lucas Chess: https://lucaschess.pythonanywhere.com
MUSIC INFO:
Release 39 → ‘Christmas’ , by ikson
Download / Usage Policy / Links below ↓
Tell Your Story music by ikson™
My Spotify Playlist: http://ikson.me/tellyourstory
[Socials]
Instagram https://instagram.com/iksonmusic
Facebook https://facebook.com/iksonmusic
Twitter https://twitter.com/iksonmusic
Twitch https://twitch.tv/iksonmusic
TikTok https://www.tiktok.com/@ikson
[Stream]
Spotify https://lnk.iksonmusic.com/spotify
Apple Music https://lnk.iksonmusic.com/applemusic
Deezer https://lnk.iksonmusic.com/deezer
Tidal https://lnk.iksonmusic.com/tidal
Soundcloud https://soundcloud.com/ikson
(or most other music streaming services, just search ‘ikson’)
GAME PGN:
1. b3 f5 2. Bb2 d6 3. d4 c5 4. dxc5 Qa5+ 5. Nc3 h5 6. cxd6 Nc6 7. Qd5 Qxd5 8.
Nxd5 Kf7 9. dxe7 Ngxe7 10. Nc7 Nb4 11. OOO Nxa2+ 12. Kb1 Nc3+ 13. Bxc3 Rb8 14.
e3 b5 15. Nxb5 Rxb5 16. Bxb5 Bb7 17. Nh3 Bxg2 18. Ng5+ Kg6 19. Rd6+ Kxg5 20. h4+
Kg4 21. Rd4+ Be4 22. Be2 10

Python Flask – Triển khai lên PythonAnywhere
Phát triển ứng dụng Web với Python Flask

Hướng Dẫn Keylogger Đơn Giản bằng Python | Lập Trình Gián Điệp Python
Hướng dẫn lập trình keylogger nghe lén máy tính bằng python tự học cho người mới bắt đầu. Giáo dục, cảnh báo an toàn thông tin cho người sử dụng máy tính.
Xin chào các bạn mình là Dũng Lại Lập Trình, hiện tại mình đang sống và làm việc tại Úc, mình từng là một học sinh chuyên toán tại THPT Hà Nội Amsterdam, sau lớp 12 mình bắt đầu du học ngành khoa học dữ liệu tại đại học Swinburne, Australia. Sau 3 năm đại học, mình nhận học bổng Tiến Sĩ và tiếp tục công việc nghiên cứu tại viện nghiên cứu trí tuệ nhân tạo và ứng dụng A2I2 ở Úc, đồng thời làm việc tại 3 trường đại học là Deakin, Monash, và Swinburne.
Metap Thẻ cá nhân thông minh đầu tiên tại Việt Nam: https://metap.vn
Thông tin các lớp học: http://dunglailaptrinh.com
👨🏫 1. Lập Trình Web cơ Bản
👨🏫 2. Toán Logic Toán tư duy cơ bản
👨🏫 3. Lập Trình Python Cơ Bản đến Nâng cao
👨🏫 4. Lập Trình Game Cơ Bản
👨🏫 5. Lập trình Data Science Phân tích dữ liệu Cơ Bản
👨🏫 6. Lập Trình AI Trí Tuệ Nhân Tạo Cơ Bản
Thông tin chuyển khoản:
009244590 Nguyễn Thị Thanh Hương Ngân hàng Quốc tế VIB
Hoặc
21510002454820 Nguyễn Thị Thanh Hương Ngân Hàng BIDV Chi Nhánh Hoàng Quốc Việt
Paypal: http://paypal.me/dunglailaptrinh
Phần note, bạn ghi: Tên facebook + Số Điện Thoại
Paypal, Vui lòng chọn \”Send to someone you trust\” hoặc \”Sending to a friend\” để mình không phải trả phí cho Paypal
Khi request vào group học, bạn ghi số điện thoại trong nội dung chuyển khoản để bên mình approve
Facebook Page: https://www.facebook.com/dunglailaptrinh
Instagram: https://www.instagram.com/dunglailaptrinh
Group hỏi đáp lập trình: https://www.facebook.com/groups/dunglailaptrinh
Tiktok làm toán: https://tiktok.com/@dunglailaptrinh
Facebook cá nhân: https://www.facebook.com/dung.lai.733
Mọi thắc mắc trục trặc vui lòng liên hệ Facebook Page Dũng Lại Lập Trình https://www.facebook.com/dunglailaptrinh
Hotline: +84888421173 (Mrs. Hương)
Địa chỉ: Sô 34 Ngõ 9 đường Võ Chí Công, phường Nghĩa Đô, quận Cầu Giấy, Hà Nội, Việt Nam
Cảm ơn các bạn rất nhiều !!!!
dunglailaptrinh education

Deploy Django Website To PythonAnywhere
In this video we deploy Django to PythonAnywhere. The first step is to commit your Django project to GitHub. Then, register for a PythonAnywhere account if you don’t have one. Open a new bash console and write the following commands:
In bash console:
git clone https://github.com/bjcarlson42/djangopythonanywhere.git
mkvirtualenv python=/usr/bin/python3.8 mysitevirtualenv
pip install django
Then, we will create a new web app. Make sure to click ‘manual configuration’ and follow the instructions in the video! Next, we need to update the WSGI file. Be sure to click save and refresh. Back in the bash console, run ./manage.py migrate in the level of your project that has manage.py, just like you would do on your local machine. Finally, update your settings.py file and add your domain to the allowed hosts.
Congratulations on successfully deploying your Django application to PythonAnywhere!
Links mentioned in video:
Docs: https://help.pythonanywhere.com/pages/DeployExistingDjangoProject/
PythonAnywhere: https://www.pythonanywhere.com/
My example code: https://github.com/bjcarlson42/djangopythonanywhere
My example site: http://benjamincarlson.pythonanywhere.com/
Deploying Django playlist: https://www.youtube.com/playlist?list=PLL1pJgYmqo2uOzLBkmgN5jxXOGunrmsP
My Coding Gear:
⌨️ Keyboard Apple Magic Keyboard https://amzn.to/3g8A8QI
💻 Laptop Apple MacBook Pro (2018 / 15 inch) https://amzn.to/3wddJHL
🖥️ Monitor Samsung CF390 Series https://amzn.to/3pDc9fO
My Camera Gear:
📹 Camera Canon EOS M50 https://amzn.to/3ixAZfq
🔭 Awesome Camera Lens Sigma (16mm / f1.4) https://amzn.to/3pH1K2B
🎤 Microphone Blue Yeti https://amzn.to/2TdXLyq
💡 Lights Neewer LED Lights https://amzn.to/3gbm6ht
My Favorite Software:
📽️ Final Cut Pro https://www.apple.com/finalcutpro/
❗ Student Discount For FCP https://www.apple.com/ushed/shop/product/BMGE2Z/A/proappsbundleforeducation
🚀 VSCode https://code.visualstudio.com/
View All My Gear https://benjamincarlson.io/gear
Support Me:
👨🏼💼 Join this channel to get access to perks https://www.youtube.com/channel/UCLMdmCCRFGWt7rktx6tMErw/join
💸 Sponsor me on GitHub https://github.com/sponsors/bjcarlson42
Who Am I?
I’m Benjamin Carlson, a developer, student, and YouTube creator living in CT, USA. I make videos on programming, computer science, and productivity. I also started a programming tutorial website called Coffeeclass (https://coffeeclass.io) that complements this YouTube channel. Finally, I have a newsletter (https://buttondown.email/benjamincarlson) where I send out updates on my recent videos, writing, and anything I’m currently working on or find interesting. You can expect emails every 2 to 3 weeks.
Connect With Me:
📧 Email [email protected]
🚅 Website https://benjamincarlson.io
🐦 Twitter https://twitter.com/bjmncrlsn
🚀 Github: https://github.com/bjcarlson42
💼 LinkedIn https://www.linkedin.com/in/bjcarlson42/
✍️ Medium https://medium.com/@benjamincarlson
📓 Newsletter https://buttondown.email/benjamincarlson
If you need to contact me, the best way is email. I try to respond to everyone but it may take some time!
Disclaimer: Some of the above links are affiliate links. This means I may receive a small commission at no expense to you. This allows me to continue to post videos like this one!
django pythonanywhere

นอกจากการดูบทความนี้แล้ว คุณยังสามารถดูข้อมูลที่เป็นประโยชน์อื่นๆ อีกมากมายที่เราให้ไว้ที่นี่: ดูบทความเพิ่มเติมในหมวดหมู่Wiki
ขอบคุณมากสำหรับการดูหัวข้อโพสต์ pythonanywhere