
Is it true that you are looking for the topic whole heart chords? If so, check it out below
Table of Contents
10 Carpenter's tips for Exterior Window Trim! | You can find all the song chords here
[penci_button link=”#” icon=”fa fa-address-book” icon_position=”left”]Watch the video below[/penci_button]
You can see more great songs provided by us here: Australia.xemloibaihat.com/chord
whole heart chords and images related to this topic.
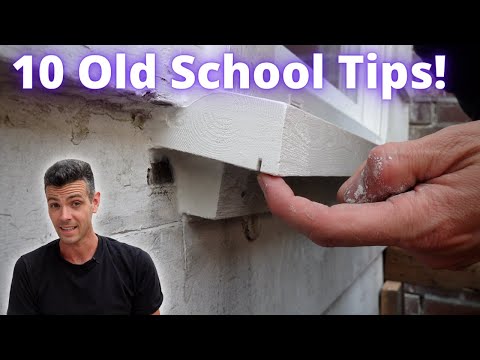
10 Carpenter's tips for Exterior Window Trim!
10 Carpenter's tips for Exterior Window Trim! and information related to this topic.
They worked in the old days and they still work now!!!
>>See more useful information provided by us here: More info here.
Keywords related to the topic 10 Carpenter's tips for Exterior Window Trim!.
#Carpenter39s #tips #Exterior #Window #Trim.
window trim,window trim replacement,window trim restoration,window trim removal,window trim black,window trim flashing,window trim seal,window trim removal tool,window trim install,window,sill,trim,install,door,fix,casing,easy,best,review,drywall,tape,taping,tools,fast,repair,mud,crack,hole,wall,patch,plaster,mudding,joint,compound,joint compound,mesh tape,setting,quickset,DIY,finish,paper tape,gypsum,wallboard,corner,knife,drywall finishing,plastering,taper,skim.
10 Carpenter's tips for Exterior Window Trim!.
whole heart chords.
We hope that the information provided by us will be of great value to you. Thank you very much.
Thanks Ben.
Hey love the videos! I've always wondered, do you offer something to customers in exchange for being "allowed" to film, or do you just explain to them that its part of what you do and tough luck?
Since Canadian dollar is so devalued, how bout you jumping the border to make some money?
Hey man, was at Lowe's the other day and picked up the Gator 120 grit drywall sanding sponge with CeraMax… it is some sort of ceramic sandpaper that resists clogging….best sponge I've ever used! It doesn't clog up at all! I got an 80 grit and 120 grit. I'm going to buy some more this week, I don't think I'll ever buy other sponges unless I'm getting an angled one.
Donkey Tracks are also called "Moons".
👍👍👍
I don't think that drip-edge is needed on a sloped cill – it's a detail for a flat bottomed cill. Water is not going to run back up a 5º slope, it's going to hang on that bottom edge and drip from there. And if you are going to make a cut in a place where water is going to collect at least make it big enough to ensure you get paint in it – make the groove at least a couple of blade widths wide..
I’m curious as to why you chose to flash under the head trim instead of over the flash trim. I believe it would help protect the top of the window and the trim better and eliminate the reliance of caulk (only) on the top of the head trim. Great video keep up the good work.
Absolutely Brilliant video!!
Can't believe you said "these ones" and "those ones"… Are you OK? Seem to be fairly intelligent… 4:50 Don't do that.
FYI…TIP 11 Never seal the very bottom of the bottom trim because if any water gets behind the trim it's now sealed in…if left unsealed at the bottom water has a way OUT…😳
Excellent tips! I have replaced many windows done this way. Some had a couple decades before I replaced them, some had a few years. I pay attention to what works and try to figure out why. I live in coastal New England and the seasonal temperature variation as well as humidity variation creates a lot of movement in your exterior cladding here. This movement in the cladding and the caulk shrinking as it dries and losing its elasticity with time kills caulk joints quickly. Taking what you have demonstrated a few steps farther, when you have the siding cut to install your trim, that is the time to scrape and sand the ends so you can SEAL the end grains with your primer so it can dry while you are doing other things and increase the adhesion of your caulk joint significantly. I would also employ back caulking along the ends of the siding to the sheathing before setting the outside corner in a bed of caulk making a gasket along the outer perimeter. Might be over kill for some areas but definitely helps with drafts and thermal draw if not keeping water out. Just a a few tips for anyone else that reads the comments like my self.
Lastly . . . I like this kind of video. What I was taught about painting – scrape and sand, then prime, then caulk, then prime the caulk, then top coat. The first primer seals the wood and keeps it from sucking up the caulk and also provides "tooth" for the caulk to adhere to. Then, after caulking, prime again, so that the texture is consistent. The caulk will have a different texture than the primer.
50 years ago, I was taught to not caulk the bottom of the apron (the lower trim board), so that any moisture that built up behind it, could drain out. Remembering that condensation and osmotic pressure, due to the temperature differential will force moisture from the conditioned space out into the atmosphere.
My granpa called donkey tracks – French Thumb Prints.
💙
As a pretty much “ do almost all of it” guy like yourself, the one thing I take away from your videos is your calm demeanor and sense of balanced purpose. You don’t come across as a high stress guy about the work. Your tips have helped me enjoy my job a bit more—thank you!
Killer tips! Being a painter, I will say one thing.. We never caulk the bottoms of window trim so that moisture has an exit. Awesome tips!!!
To hell with you and your blunting nail bs. I know I should but I never remember.
I came to your channel to learn about drywalling. Now you are trying to teach me carpentry? wtf!
Useless info
Donkey tracks is a better name! We call those "half moons" in New Zealand
Good on you bro for taking your boy to work. A couple days doing real work with dad is better than a couple months of school. I have great memories of going out with my dad, and taking my son out with me.
That siding is looking rough. Let’s make a video about replacing that sad siding.
I had issues with bin123 peeling after a year, Recommendations?
The reality of the rich and the poor is this: the rich invest their money and spend what is left. The poor spend their money and invest what is left"*
Hats off to Sir Joseph Whitworth the father of engineering, for teaching (without an engineering degree ) the British Navy that Blunt or flat tip projectiles penetrate straighter, truer and deeper than pointed. I.E. Wadcutter/Semi Wadcutter. And hats off
to Vancouver Carpenter for teaching with self deprecating humor, (the sign of a true leader). Really, cheers from a Chicago Finish
Carpenter for making education both palatable and hilarious. Thanks
PS I’ve been known to be a jackass on occasion too. LOL
Paint and primer on dirty paint. Caulk on dirty paint. I give this repair 2 years before the caulk fails and water gets in. I love how you didn’t bother replacing the mini vents under drip edge.
Stick to drywall my friend.
Any chance you’ll be plastering a brick wall anytime soon? I have a brick wall in my house which I put plaster primer on today but I am gonna need some instructions for the actual plastering process. I know you Canadian/Mericans just do drywall’s normally but maybe you can find a wall to plaster and make a video on it? Either way, great channel you have👍🏾
why the owner wanted cove ceiling detail in rental!!
Good work, and tips…now go skate
If you had a metal break you could break a custom piece of flashing to go up under the siding and over the top trim board. We have to do that all the time, and just throw a couple trim nails in the siding to grip the flashing as well.
This is nice, cool stuff. Thanks for sharing and explaining.
do your best, and caulk the rest! nice
I agree 💯% with tip #4. I've repaired so many homes where the wood looks good but on the edges/cuts where the wood was not painted it is rotten and a small repair turns into a big one because all the boards now need to be changed. $$
Yeah, that was probably our smoke wafting up your way. Sorry about that. We weren't thrilled with it either and pretty much stayed inside as much as possible. (I'm in eastern Washington state -you know, the dry side. The Idaho panhandle also had its fair share of fires.) There was no escape from the smoke for a good while there. Thankfully the fires are out and the smoke has pretty much cleared. Hopefully we are finished with the wildfires this year as we begin the last days of summer and look toward heading into fall. ☺👍
Beautiful job brother….as a maintenance tech your videos help me a lot man! Thanks!
Donkey tracks, lol. That flashing turned up… yeah, I'm not sure I would turn it up on the ends, eventually swelling shrinking could cause it to separate and water will be happy to enter and do it's thing…
That dynaflex 230 is some awesome caulk.
16oz hammer
Prenailing is something I often do but to avoid splitting the wood I drill holes first. Drill a hole the size of the nail and it will go through like butter. If you plan on recessing the nail for something nice like trim the hole can be even slightly wider than the nail. This makes tapping the head down in very easy. You don't have to bash the nail in and make a donkey track or gouge the wood with the tool to tap it in if the hole is predrilled and wider than the nail, the nail just goes straight down.
Thank you for sharing the details of trimming and rain protection of the window exterior. Another great carpentry tutorial and way cool getting your son involved in carpentry at age 12 years 😀
What are the 3 circles on the wall under the window sill?
I was taught while laying any caulk to "inject" it into the joints so it will fill in the voids and not just sit on the surface. More area for the caulk to bond will give it more strength.
I don't know the codes in Canada but in the US you have to put Z – Metal on the top trim and have to make it a 1/4" longer on the sides so you can bend it over the ends and it goes on top of the house wrap.
I’m hanging out waiting on hurricane Ida to hit watching this- bout to find out if my home builder did all this! Great time to check for leaks 😁😅
Bin der dun dat type of old carpenter. Wish vids like this would have been done 40 years ago so that tips like yours wouldn't have had to be learned the hard way! Agree with using Dynaflex 230. It's also good as a poor man's substitute for soundproofing cracks instead of Green Glue! Just one comment. I eschew the messy, often wide concave finger caulking look between the new window and trim. I make a clean caulk line using tape just like you and I do with sealing around counter tops except with wood trim, I only tape off the window. GK